
Posts by :
- You have to have either an LED or UV light.
- LED lights are generally more expensive but dry the polish much faster.
- Not all brands will work with LED lights, but most brands work with UV light. There are exceptions to this rule, so find out which light is required by your chosen brand of polish before purchasing the polish and/or light.
- Not all gel polishes are created equal. Do your research and read reviews on the polishes that are the best. So far, I like OPI, Sally Hansen, CND and Candy Lovers.
- For best results, you have to put your nails into the UV or LED light between each layer of polish.
- For each manicure you will need one or two gel polishes, a top coat polish and a base coat polish.
- In addition to the polishes and LED or UV light, you will need to invest in good tools and supplies: cuticle oil, cuticle trimmer, files, buffers, acetone, tweezers, brushes (optional, for art), dotting pens (optional, for art), alcohol wipes, nail clippers, cuticle pusher, orange sticks, lint-free wipes for nails, pointed cotton swabs, and decorative jewels, decals, and nail glue (also optional).
- Find an area to use that is a safe zone if you accidentally spill polish or acetone. I like to use a folding table that I bring out just for doing my nails.
- Place a cover over the table that protects it (if necessary), such as an old blanket or cheap table cloth.
- Place your LED or UV light in a place on the table or nearby to allow easy access.
- Poor a small amount of acetone into a container for easy dipping when necessary.
- Lay out your nail prep, base coat, 1 or 2 gel nail polishes, top coat, and cuticle oil on the table.
- Lay out all tools and accessories.
- Clip nails to desired length.
- Using rubber cuticle pusher or orange stick, push cuticles down.
- Using orange stick, scrape white rough areas left on nail after pushing the cuticles down.
- File and buff nails until they are smooth. Use coarser files to help even out the tips of the nails. Use buffers to smooth tips and buff out ridges on nails.
- Wash hands and nails thoroughly with soap and water. Dry nails completely.
- Apply nail prep solution and wipe off. This step is necessary to make sure base coat adheres to nail.
- Working with one hand at a time, apply base coat being careful not to touch cuticles. All polish should only be on the nail bed.
- Using pointed cotton swabs dipped in acetone, clean around edges or cuticles where base coat went past the nail bed. This is very important with gel base coat, because once it’s cured by the light, you will not be able to get it off and it will feel like glue.
- Place hand into the light and let it dry the recommended time by the light manufacturer or polish. I usually go for 3 minutes. A good base coat will still be sticky when finished.
- Apply first coat of gel color and repeat step 8, making sure all excess polish is cleaned up before curing.
- Cure first coat of gel color in the LED or UV light.
- Apply second coat of gel color. Again, repeat step 8, making sure all excess polish is cleaned up before curing.
- Before curing in the light, decide if you will apply any jewels.
- With the second coat of gel color still wet, using tweezers, apply any desired jewels to nails. If necessary, you can place a tiny dot of nail glue on the nail first.
- Place hand into light and cure the second coat of color and any decorative jewels that have been applied to the nail.
- If you want to put any decals onto the nail, now would be the time to do it (nails should feel dry).
- Once all designs (if any) are placed onto the nails, it’s time for the top coat.
- Apply the top coat. Again, repeat step 8, making sure all excess polish is cleaned up before curing.
- Cure top coat in the LED or UV light. I go extra time for this step (5 minutes in UV light).
- Rub nails with lint-free alcohol wipes. Nails will feel sticky before doing this step and will feel smooth and dry after this step.
- Put cuticle oil on the cuticles and rub it in. Wipe off excess cuticle oil.
- Voila, you’re all done…well almost, because that’s just one hand. LOL. You can certainly do both hands with each step, but I found it easier to do one hand at a time, because then you have a completely dry hand to work with when painting the other hand. Also, if you paint any decoration, you have your other hand for comparison.
- Be honest about what is causing you to procrastinate. The reason may be fatigue, anxiety, fear, dislike of the task at hand, inability to do the task, or any other of a number of reasons. Once you figure out the reason you are procrastinating, you have to deal with that reason and then make the task a priority.
- Break large tasks into smaller ones, so you don’t feel so overwhelmed.
- Keep a written to-do list that consists of daily tasks, weekly tasks, and long-term tasks. For the daily, this might be things like house cleaning chores. For weekly tasks, this might be things you hope to accomplish during the week, but not sure which day you will do it. This could be something like making a phone call to schedule a yearly physical (one on my list that I have put off for a while because I just don’t like going). For long-term tasks, this could be something like getting things together to take to Goodwill.
- Keep your to-do list with you at all times, so that you can add to the list at any time. You can also use this list as a reminder to keep you focused, when you have some spare time, like waiting at a doctor’s office.
- Always try to accomplish the hardest tasks, first. This way, you will have a sense of relief and feel more confident going forward with the remainder of the to-do list. I like to assign numbers to my to-do lists, to help me stay on track.
- Try to avoid distractions when working on your tasks. For example, I almost always move much slower if my TV is on. When I turn it off, I get things accomplished much faster. If you receive an unimportant phone call while in the middle of completing a task, ask the person if you can call them back later. You don’t have to explain why, accept that you are busy. If it is important they will let you know. If not, they usually won’t mind waiting for you to call them later.
- Try to complete one task, before starting another. If you are in the middle of paying bills, then don’t stop to fold a basket of laundry. If you are folding laundry, don’t stop half way through to make a phone call. Speaking of laundry, when you fold it, try to follow through then with putting all the clothes away. It’s not a chore anyone likes to do, but leaving it for later only causes more clutter and stress.
- Find ways to reward yourself for completing large tasks or many smaller ones. It is okay to carve out some time for yourself to relax. Just be realistic about the time you take to relax. Don’t plan on taking an hour break, and then 3 hours later you are still doing nothing. I like to relax at the end of a busy day. This is my way of unwinding before bedtime and rewarding my self for all my accomplishments that day. In the past I would work hard right up until bedtime because I felt there was still so much left undone. However, I am now finding that the work will still be there the next day, and it’s important for my health to have some relaxation time, as well. This one is still a huge struggle for me, because I am a workaholic once I get started on something.
- When prioritizing your to-do list, be realistic about how much you can get done in a day. Don’t try to be a super human. Having too many things on your to-do list will usually leave you with part of your list unfinished. Also, don’t beat yourself up if you don’t finish the list. Just make those items a priority for the next days’ list.
- Before quitting for the day, make sure you have your list ready for the next day, so that you wake up knowing what you will start on, first. It will help you stay focused.
- 1 gallon of water
- 6 small tea bags
- 8-10 strawberries (depending on desired taste)
- Stevia liquid sweetener
- Brew tea bags in 2 quarts of water.
- Add brewed tea to gallon pitcher
- In food processor or blender, puree 8-10 strawberries.
- Add puree to tea.
- Sweeten individual glasses with zero-calorie liquid stevia.
Home Gel Manicure – Easy, Cute, Affordable, and Time-Saving
November 2nd, 2015
 Ladies love a good mani and/or pedi, don’t they? I’m certainly no exception. I have very thin nails that tend to break. In spite of taking vitamins and putting all kinds of products on my nails to strengthen them, they just won’t grow and break easily. Let’s face it, they are just ugly!
I had tried many times through the years to polish my own nails, but A.) They looked like a 2-year-old painted them; and B.) They usually started to chip in two days. So, I finally thought I must resign myself to the fact that if I wanted cute nails that would last at least a week or more, I had to go to a salon and spend the time and money it would take to get them done.
After years of this, I started thinking there must be a better way. It might not be the way that works for everyone, but it works for me. I personally don’t enjoy going to a nail salon; I go for the end result – not to be pampered. I’d rather spend my money buying a new blouse or purse, than spend it at a nail salon.
As I usually do, anytime I want to learn something new, I sat down at my handy computer and started researching. I found literally thousands of videos on YouTube about different ways to do your nails. I was so hopeful and excited, I couldn’t wait to get started.
While at the salon, I would normally get the white French tip acrylic nails for my hands and then just have them do a regular polish on my toes. Sometimes I would get one toenail with a hand painted design.
After researching, I found a product, Artisan Flexwrap Acrylic Dipping Powder Pro, that I used to do the acrylic French tip manicure. I did try this and was amazed with the results, however, it is a product that is still harsh on your nails when trying to remove them. I only like them because they will last 2-3 weeks for me (since my nails grow slowly). So, while I will still occasionally do this, I wanted easier and less harsh alternatives for most days. Later, when I do the French tip nails again, I’ll share an article about how to do them and post pictures.
The next alternative to something that is more durable than a regular nail polish is the gel nail polish. After much trial and error, here’s what I found necessary for gel manicures:
First prepare your work area:
Next, prepare your nails:
Nail Removal:
To remove nails soak them in acetone for about 15 or 20 minutes and then lift them off with the orange stick. Do not scrape, because this can damage your nail. Continue soaking until the gel polish comes off easily. Finish clean up by wiping nails with acetone soaked wipe. I like the Onyx Proffessional Soak Off for removal. Onyx Professional Soak Off Shellac & Gel Nail Polish Remover Coconut Scented 4 oz – Removes Gel Nails, Nail Polish, Artificial Nails, Nail Glue, Glitter Polish & More.
For the nails I’m showing here, I did all of the steps shown above, but after the 2nd coat of color was cured, I then used a different color of gel polish and applied the dots by using a dotting pen. I then had to, of course, cure this layer in the light, as well. WARNING: Make sure your first color is completely dry before applying a second color, because the two colors will run together, if you don’t. Then I applied the top coat to the newly decorated nail. All the polish was by the brand, Candy Lovers.
Candy Lover Brand 6 pcs Nail Gel Polish 10ml Soak Off UV Gel Nails #25
One more bit of information I wanted to tell you is that it is going to take some time to get used to doing this. Allow plenty of time to do this. I like to sit on a Sunday afternoon and watch movies as I do this. It is sort of forced “me” time that I, would not normally allow myself to enjoy. I also love that I am saving money in the long run, even though it will cost you initially to buy all your necessary polish, supplies and tools.
I hope this helps to give you the courage to start doing your own manicures. Please also check out YouTube.com to find all sorts of pretty patterns and unique techniques. There are tons of decals, jewels and other accessories available on Amazon.com.
If you have any questions please leave a comment. I also welcome all tips, because I am still a newbie at this.
Cleaning Out the Blog Clutter
September 11th, 20159/23/2015 Update:
The blog maintenance is complete for now. We have not done all the changes to layout of the site that we would like to do, but with all the trouble we ran into with just doing necessary upgrades, we have decided to postpone the cosmetic changes for now.
The good news is we will now be posting new blog posts. Thanks again for your support and your patience during this time. Please let us know of any new topics you’d like us to discuss in future posts. We love doing research and are happy to give our opinions on any topic related to Cleaning Out the Clutter of our lives.
————————————————————————————————————————————————————————————————————–
Hi everyone! I wanted to give you an update with what’s going on with our website. As you can see we have not posted anything in awhile. To begin with, this was due to various personal reasons for both Krista and myself. I won’t get into all that again. However, now, for the past month, we have been going through a maintenance of the site…offline. We are upgrading software and eliminating incompatible elements of the site. This is taking some time to make sure that nothing gets lost in the process. It’s not as simple as copy, change and then put back. Blogs don’t quite work the same as normal websites. During this time, we’ve chosen not to post any new articles until this is complete, because then we would have to re-post all over on the new site and that might just complicate matters. Unfortunately, the technical part of the site is my domain, since I have my web design and hosting company, as well as blogging on Cleaning Out the Clutter. With that being said, I’ve had some delays because of work to complete for clients (yes, paying clients). Although, my passion is still with blogging and writing, I have to do what it takes to pay the bills.
With that being said, my goal is to complete the maintenance and upgrades this weekend. Then, this next week we will begin posting articles again.
Thank you all for your patience and loyalty. We do love our readers and supporters and look forward to connecting with you.
What clutter do you plan to work on this weekend?
Checking Out the Local Gym For Group Exercise Classes
March 29th, 2015
A gym membership might be a great way to get healthier and socialize. Recently, I was actually searching for some topic on cycling and ran across information on a local gym. It was called “Tracy’s Fitness” but the location was in a sports center in my home town. Yes, I admit, I am a home body and there are probably lots of places I’m not aware of in our little town. After checking out the website, I found out this “Tracy” offers all sorts of fun classes, as well as one-on-one personal training, including such topics as nutrition.
Guess who got outside of her comfort zone and decided to go check this place out this week? By doing so, I found out that for a monthly fee of $29.00, I could participate in any of the offered classes. There are no required contracts so you can quit at any time. The classes were scheduled around all hours of the day, making it hard to come up with excuses not to try at least one of them. After a a short conversation with Marla, the nice lady behind the desk who was happy to indulge me by answering all my questions, I found there were lots of women who were out of shape or older than me (I know, older than 51 – hard to imagine, but true story). Armed with a class schedule and a new boost in confidence, I think I will now try at least one of the classes. Who knows, I might actually enjoy it and even socialize. Wow, now that’s a novel idea!
My point for sharing this information with you is that maybe you, too, can try to get outside of your comfort zone and see if there are any gyms in your area offering classes. You might use the excuse, “well I can’t afford the $29.00/month.” Really? Are you serious? I know that may be true for some people, but the vast majority of people will pay that to go out to eat at a restaurant, or pay more than that as a co-pay to their doctor they have to see because they are overweight and put too much stress on their knees and need an injection to relieve the pain. If we keep doing what we have always done, then we will keep getting the same result! This is the reason I recently purchased a new bicycle (I’ll save that story for another time). Next step, actually contact Marla and choose a beginner’s class. I will let you know how it goes. We can all do things to improve our health, no matter what physical or financial condition we are in. Remember, a healthy body is an active body!
Note: If you decide to join, don’t forget to take some equipment such as a yoga mat (one you know is clean and sanitized by you), water bottle, and a towel.
PURPLE NPR Yoga Mat 72x24x1/2″ – ²AAAFZPolar Bottle Insulated Water Bottle, Lemon Grass, 24-Ounce Sinland Ultra Absorbent Travel Sports Microfiber Towels w/ Carry Bag (Purple, 16″x32″)
All It Takes is 20 Minutes
November 23rd, 2014 Are you one of those people that makes excuses about why you can’t work out? Well I certainly had my share of excuses. Not anymore! What I’m about to tell you is going to totally change how you feel about exercise.
Recently, I was sitting in my house working on my computer, as usual, and I received a call out of the blue. It turns out it was from a very successful Life Coach who was looking for someone to work on her website. After many phone conversations, she revealed she needed help with more than just her website. I had been given a gift of an awesome opportunity to work with this lady. I loved what she did for a living, because it was exactly the sort of positive lifestyle I have strived for with this blog. I also knew I had skills that could benefit her. It was a win-win situation for both of us. She is a health and fitness expert, among other things. Little did I know that she would be willing to actually coach me while we work. She wants to help me and then use me as an example of positive change for a testimony in her upcoming book, or when she speaks at events.
To make a long story short, she has taught me no matter what you may think, anyone has time to exercise. You make time for the excuses, but not for the exercise. Here are the tips she gave me that changed my life. You have to re-train your brain to believe that exercise is not a bad thing. All you have to do is 20 minutes a day and be consistent with it. Once your brain has become programmed to the 20 minutes then it will be automatic. After the 20 minutes you can and probably should do more, but 20 minutes will work miracles for you. If you do it first thing in the morning, it boosts your metabolism and sets the tone for your day. The movement can be very simple, but just get up and get your 20 minutes done before you do anything else for the day. Simple, right? It’s crazy, but it works. I went from making excuses, to feeling guilty if I didn’t at least get my 20 minutes in. I am already seeing the results and it’s only been a couple of weeks. Another tip she gave me was to celebrate when you are done. This trains your brain that it’s a good thing. I don’t mean to celebrate by eating an entire bag of cookies. Give yourself a pep talk by saying, “good job,” or “Yay, I did it.” You may also want to reward yourself by doing something special for yourself. For me, this would be something like sitting for 20 minutes and reading or flipping through a magazine. Whatever it is, make sure to train your brain that celebrating is fun, so the 20 minutes is worth it.
I am still fortunate to be working very closely with my new “boss,” and with her permission, I hope to share a lot more tips with you in the future. Now get up off that couch and get your 20 minutes done. You can do it!
Leslie Sansone: Walk Away The Pounds: 30 Minute Walk
10 Steps to Solve Any Problem
October 2nd, 2014 We all have problems from time to time, right? Some are little problems and some are big problems. Well, how many of you go about trying to solve your problems in a methodical and logical way? Perhaps you are one of those people who throws your hands into the air and makes a mountain out of a mole hill. Whatever the case is, here are 10 tips you may want to try for solving any problem:
1. Identify the Problem . Sometimes, not clearly identifying the problem allows you to live in denial that a problem really exists, or will allow you to believe that it is something that can be put off until another time, when in reality, it needs to be handled sooner, rather than later.
2. Identify the worst possible outcome of the problem and then explore any fears you may have about this. Are your fears realistic? In most cases, the fear is not even a realistic one. If you are anything like me, your mind will play tricks on you and blow it way out of proportion.
3. If the problem requires research, take the time to do thorough research by using the Internet, books, library, experts, or any other means necessary to make sure you are familiar with the subject, Don’t just make assumptions or guesses. Often times when you have finished researching the problem, you will find your fears unfounded and you will become confident there’s a solution to be found.
4. Focus on finding a solution, rather than focusing on the problem. If you go around complaining about the problem over and over, but never do anything about it, then you will stay stuck in that rut and the problem will take on a life of its own. A small problem can become a huge problem by in a short time by focusing on the negative, rather than focusing on finding a positive solution.
5. If necessary, get advice from friends or family, but don’t let them focus on the problem. Make it clear to them that you are trying to find a solution to your problem. If they don’t have a solution but want to simply contribute to your pity party, then move on to someone who can help you focus on the solution.
6. Try to think of more than one solution. Of course it’s our human nature to first try the solution we think will be easiest. The easiest solution is not always the best solution. If our first solution fails, we need to have a backup plan. Speaking of failure, don’t be afraid to fail. In times of failure, there is always a lesson to be learned. Some of the greatest people though out history failed many times before they finally succeeded. There is no shame in failing, but you will surely feel guilty if you want to try something, but are too afraid to even take the first step. Fear is one of the biggest contributors for people being stuck in a rut, or wallowing in their own misery. In a sense, they’ve become comfortable with their new self-imposed victim identity because it’s an easy excuse for why they have not reached their goals. For example, people who like to say, “Well, I came from a broken home, therefore, I didn’t get an education.” They choose this path, rather than saying “I came from a broken home and saw my mother barely make ends meet. This made me determined to get an education so I would have better opportunities in life and not have to struggle, living paycheck to paycheck like my mother did.” This may be a far-fetched idea for some of you, but you get my point, I’m sure. We are all born with certain gifts and abilities, despite our negative circumstances.
7. Write your solutions out on paper and then go through them one by one in your mind. Identify any possible pitfalls. If necessary, scratch off any solutions that cannot possibly work.
8. Put your possible solutions in the order in which you want to try them and then get started. After you have gone through your list of possible solutions and you still have not solved your problem, then start over with step one. In most cases, something else will come to mind, or you’ll think of someone new to help you solve the problem. Perhaps you may even discover a new resource, such as a website or book, that you had not previously discovered.
9. Never give up. Life is too amazing to ever give up on finding solutions to our problems. Remember, life is not about the destination but about the journey. It’s about relationships with people, learning, growing, loving, exploring, discovering; etc. Just realize while you’re solving a problem, you’re challenging yourself and growing. You will always come out on the other side a better person for having survived the journey of working through your problem.
10. Once the problem is solved (and I know you WILL resolve it), then ask yourself what lessons you learned. Ask yourself how you will do things different in the future. What did you discover about yourself, that you did not already know? How can you use this experience to help others?
In conclusion, I want to leave you with these final thoughts:
1. Remember, to every problem, there is usually at least one solution.
2. You are not alone in this world. There is always someone willing to help.
3. Enjoy the process of solving the problem. Don’t be afraid to fail. Know that there is always some good that comes from every difficult situation.
4. Look for the life lessons in every problem and accept the problem. Some problems will go away on their own, but the bigger problems will usually just get bigger each day. Face them head on and pat yourself on the back when you’ve solved the problem.
Good luck! YOU can do it!
10 Tips to Overcome Procrastination
July 28th, 2014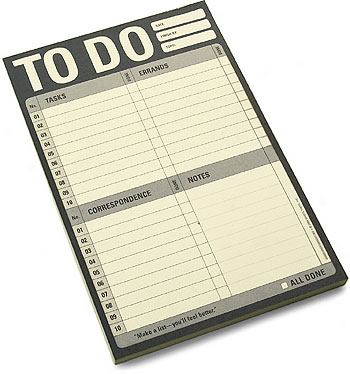 Procrastination is not something most of us strive for when trying to accomplish goals or daily tasks, yet most of us have been guilty of it at some time or another. In my life, it seems to be a recurring theme.
Over the past few years, I have found that procrastination was a luxury I could not afford. With taking care of three ill parents, death of two parents and father-in-law, finishing college, helping my husband in his business, re-inventing my old business, tons of my own medical problems, a daughter getting married, and starting the blog, my life has been busy, to say the least. As if this is not enough, my husband works away from home most of the time, so I’m left with all the household chores, paying bills, handling of our personal business, and anything else that comes up.
In trying to reduce stress and enjoy life more, I obviously need to be able to accomplish certain tasks in a timelier manner, so I am not left with feelings of guilt and defeat, or don’t become overwhelmed.
I still struggle with procrastination on a daily basis. Knowing there are many people like me, I decided to share with you some of the ways I’m learning to procrastinate less, and accomplish more.
I hope these tips on overcoming procrastination help you. Have I overcome procrastination? Of course, not – I am a work in progress! Please let me know any tips you have for overcoming procrastination or comment on any of the tips you’ve read here. We love to hear from our readers. Now go make that to-do list and get started! You can do it!
Previous Cleaning/Organization Tip: How I follow My Budget
Homemade Cinnamon Mouthwash
June 13th, 2014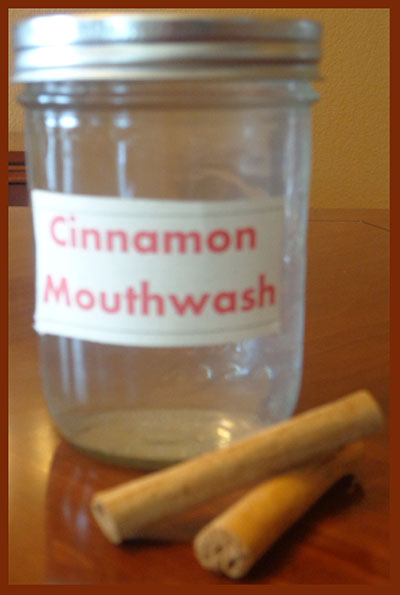
A while back I took the plunge into the world of homemade mouthwashes. I was searching for a way to go all natural, while still addressing my issues with my periodontal and autoimmune disease. I did quite a bit of research and came up with a combination of ingredients I thought might work for me. You can read about my history and how I chose the ingredients for a homemade mouthwash in my first article, Homemade Antiseptic Mouthwash.
I am happy to announce my last dental cleaning was great. My dental hygienist told me the plaque and tartar buildup was the least amount she had seen in awhile. I told her I had been using the mouthwash. She said, “Well, whatever you are doing, just keep doing it.” Go me! I was so excited to be saving money and possibly even improving the health of my teeth and gums.
This new cinnamon mouthwash has a very pleasant taste and should be just as effective as my previous peppermint mouthwash. I hope you will try it and enjoy it as much as I do. Remember, if you don’t like it, you can still go homemade by coming up with your own combination of ingredients. There are many recipes to be found on the Internet. Please share any recipes you like. Enjoy!
Homemade Cinnamon Mouthwash:
2 cups of distilled water
¼ cup of hydrogen peroxide
6 drops of cinnamon or cinnamon bark essential oil
4 drops of clove essential oil
6 drops of tea tree oil
1 teaspoon of liquid stevia
1/2 teaspoon of sea salt
Instructions:
Place all ingredients into a mason jar or other glass jar containing a lid. Shake before each use. Keep a small glass or other small container such a baby food jar near sink to pour mouth wash into for drinking. You don’t want your whole family drinking out of one jar. Otherwise, you can make mouthwash for each family member and choose a variety of flavors, so they can just take a swig straight from the jar. Swish mouth wash around in mouth for approximately 1 minute and spit out. DO NOT SWALLOW.
Warning
Do not swallow or ingest this mouthwash. Keep in a safe place, away from small children. As stated earlier, consult with your doctor if you are pregnant.
NOW Foods Tea Tree Oil 4 oz
NOW Foods Tea Tree Oil 4 oz.
Cinnamon Bark 100% Pure Therapeutic Grade Essential Oil- 10 ml
NOW Foods Clove Oil, 2 ounce
NOW Foods Clove Oil, 2 oz.
NOW Foods Better Stevia Original Liquid Extract, 8 Ounce Bottle
NOW Foods Better Stevia Original Liquid Extract, 8oz.
Easy Mexican Cornbread
June 10th, 2014Cornbread is a tradition in the south, especially with a good pot of homemade pinto beans. Okay, so it may not be the most healthy food, but it’s SO GOOD! Today I wanted to share with you one of my family’s favorites – Mexican Cornbread. It is a different twist on the traditional yellow cornbread and will likely become a favorite of your family’s as well, especially if they like spicy food. You can choose to make your cornbread from scratch, but I chose to make it easy by opting for the pre-packaged yellow cornbread mix. Please leave a comment and let me know if you enjoyed it.
[yumprint-recipe id=’1′]
Strawberry Iced Tea
April 30th, 2014 Spring is here. It is that time of year when flowers are blooming and grass is turning green. It is also the time of year when everyone is outside mowing their yards, trimming trees and shrubs, and gardening. In the south, we have another tradition – that is sipping on a cold, refreshing glass of iced tea. Nothing beats it on a warm spring or summer day. We know it’s not just us southerners who like to enjoy it, but we like to think we invented it. In our minds, in the south, we drink iced tea, but “those folks up north are just strange and prefer hot tea.”
No matter where you live, if iced tea is a drink you enjoy, you are sure to enjoy this recipe. I actually got the idea from my husband. I had gone to Wendy’s and ordered their strawberry tea. I later told my husband about it and how much I enjoyed it; of course, he had to try it for himself. Later, he called me and told me about how he had been ordering it and taking it home and dumping it into his pitcher of tea he already had in his refrigerator (he works away from home). A few days later, he called me and told me he puréed some strawberries in his Magic Bullet and poured them into his iced tea. He said it was delicious. So, of course, I had to try it at home, as well. The result was very good.
Okay, so I finally beat my soda addiction to now become addicted to strawberry iced tea (progress, not perfection). What other fruits can I think of to purée and add to my iced tea? I hope you enjoy it as you sit on the veranda watching all your sweaty yard men (or women) take care of your lawn and gardens (a woman can dream, right?).
Don’t forget, strawberries also have antioxidants, so tell yourself you are doing something good for your body. Enjoy!
NOW Foods Better Stevia Original Liquid Extract, 8 Ounce Bottle
We Have a Winner!
April 14th, 2014 Congratulations to Monica Young! She won the $50 Amazon Gift Card in our Giveaway! Thanks to everyone for participating. We will be giving away other prizes during the year so keep coming back. Thanks for your continued support!
Sincerely,
Krista Davis and Rhonda Wylie

